More than the several years, the virtualization function has been utilised to run two or additional operating devices on a single device. These times, you have several Virtualization softwares like Virtualbox, VMware, and so forth, all make it possible for you to create virtual pcs and operate distinct operating methods.
On Home windows 11, you also have Hyper-V, a Microsoft products that makes it possible for creating & managing many virtual devices on a solitary device. Hyper-V is a terrific products as it supports Home windows, Linux, and FreeBSD, but you will rarely sense the need to have for it if youre a frequent person.
Recently, a couple of Home windows 11 consumers have recognized Hyper-V functioning on their PCs even when they havent made use of it. When managing in the history, Hyper-V can take in lots of RAM and drain battery daily life.
How to Disable Hyper-V on Windows 11
For this motive, its a superior strategy to keep Hyper-V disabled on Home windows 11. Also, if you program to use other virtualization computer software like VirtualBox, its suggested to turn off Hyper-V initially to stay clear of any conflict difficulties.
There are not one by quite a few various approaches to disable Hyper-V on Windows 11. We have shared all of them beneath. Allows test out.
1. Disable Hyper-V from Windows Characteristics
1 of the simplest strategies to disable Hyper-V on Home windows 11 is from the Home windows Attributes. Comply with the actions shared down below to disable Hyper-V from Home windows Capabilities.
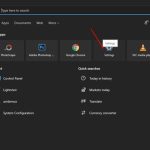
1. Form in Command Panel on the Home windows Search. Following, open up the Management Panel app from the checklist of greatest match final results.
2. When the Regulate Panel opens, click on Packages and Characteristics.

3. On the still left facet, click Turn Home windows Features on or off.

4. On the Windows Functions prompt, uncheck the Hyper-V.

5. Following, uncheck the Windows Hypervisor Platform. After done, click Okay.

Thats it! Right after producing the changes, restart your Home windows 11 Computer system. This need to disable Hyper-V on your Pc.
2. Disable Hyper-V Utilizing DISM Command
Make certain that your personal computer is connected to the internet prior to you observe this technique. Heres how to disable Hyper-V on Windows 11 utilizing the DISM Command.
1. Style CMD in the Windows 11 Lookup. Upcoming, appropriate-click on on CMD and pick out Operate as administrator.

2. When the Command Prompt opens, execute this command:
dism /on the net /disable-attribute /featurename:Microsoft-hyper-v-all

3. Right after executing the command, near the Command Prompt.
4. Make absolutely sure to restart your Home windows Laptop to use the improvements.
Thats it! This will transform off the Hyper-V aspect soon after the restart.
3. Disable Hyper-V on Windows 11 using PowerShell
You can also use the Powershell utility to switch off the Hyper-V characteristic on your Windows 11. Heres how to flip off hyper-v via Powershell.
1. Sort in PowerShell on Home windows 11 Lookup. Up coming, correct-click on PowerShell and pick Operate as administrator.

2. When the PowerShell utility opens, execute this command:
Disable-WindowsOptionalFeature -On-line -FeatureName Microsoft-Hyper-V-All

3. On the confirmation prompt, type Y and push Enter.
Thats it! Just after building the modify, restart your Home windows Computer. This should really disable Hyper-V on your Laptop.
4. Disable Hyper-V utilizing the BCDEdit command
You can use the BCDEdit command-line utility to manage the hypervisor start method. The identical can be utilized to disable Hyper-V as very well. Heres how to disable Hyper-V making use of the BCDEdit command line utility.
1. Sort CMD on the Windows 11 Search. Up coming, correct-simply click on the CMD and pick Run as administrator.
2. When the Command Prompt opens, execute this command:
bcdedit /established hypervisorlaunchtype off

3. Soon after executing the command, shut the command prompt.
Make guaranteed to restart your Home windows 11 Pc to use the changes. This should really disable Hyper-V on your product.
5. Disable Hyper-V on Windows 11 through BIOS
Even nevertheless you can disable Hyper-V by next the higher than procedures, its vital to observe that if your Pc doesnt have the hardware virtualization enabled, the Hyper-V or any other virtualization plan wont operate.
So, if you dont want to use any virtualization packages, its most effective to disable the components virtualization from the BIOS.

- Restart your Home windows Computer system.
- Now, use the selected important to open up the BIOS configurations.
- When youre into BIOS, switch to Configuration.
- Find the Virtualization Know-how selection. Following, find Disabled.
- Save the improvements by press the F10 vital and exit.
Thats it! This will turn off virtualization on your Computer. No virtualization applications will function from now on.
Do note that the selections to obtain BIOS and disable virtualization might fluctuate. You can locate the alternatives to obtain BIOS and disable virtualization by examining the help paperwork or having the support of the producers web site.
These are very simple strategies to disable Hyper-V on the Home windows running program. Allow us know if you want extra support in disabling Hyper-V.